Friday, October 22, 2010

Sick time = craft time

I’ve been feeling pretty rank the last few days, but I’ve tried to suck it up and go to work (hopefully I didn’t give germs to TOO many kids). Today I woke up and knew there was noooo possible way I could go to work. I could hardly talk and had to cough after every 2-3 breaths. So I called in sick. Jay went to work and I told him I would ‘rest’. He walked out the door and I pulled out my sewing machine. Crafting is just as meditative as actually sleeping, so I figure I might as well craft instead of trying to sleep (let’s face it sick-sleep is not very restful, I get woken up about every 3 minutes by my gross cough). I wanted to make us some cute little birdies to hang on the door. Let me explain.

Last weekend, we went to a baby shower for a frien
d of ours. We made them a homemade baby mobile, out of 'natural materials'. We bought some wool felt from the fabric store, in 5 non-bright colors:I sewed 4 little birdies, with bodies that were different colors from their wings. We chopped down a madrone branch in the forest and used that as the top-bit of the mobile, 2 branches nailed together so they could still swivel. Jay used his tools to cut and then sand a small sun, which he oiled with olive oil. The sun hung from the center of the branches, down between the birds. The birds were hung from yarn at each end of the 2 branches. Here is a not-so-good picture of the result (check it out, I'm brushing my teeth in the background):

I thought it was really cute. Jay did too. I think the family we gave it to did too. It was a really fun present to make, didn’t take that long, and I hope the baby will love looking at it.

So on this here sick day, I was feeling inspired to make a few birdies for decoration in the bus. I made a paper pattern for the bird and it's wing. I got the idea for felt birds from this awesome site, but chose to simplify the tail so it'd be easier to sew. I also think this bird mobile is super cute, but it doesn't work well with felt. Each bird is about 7 inches from nose to tail tip. I copied and cut out 2 bodies and 2 wings from each felt color:

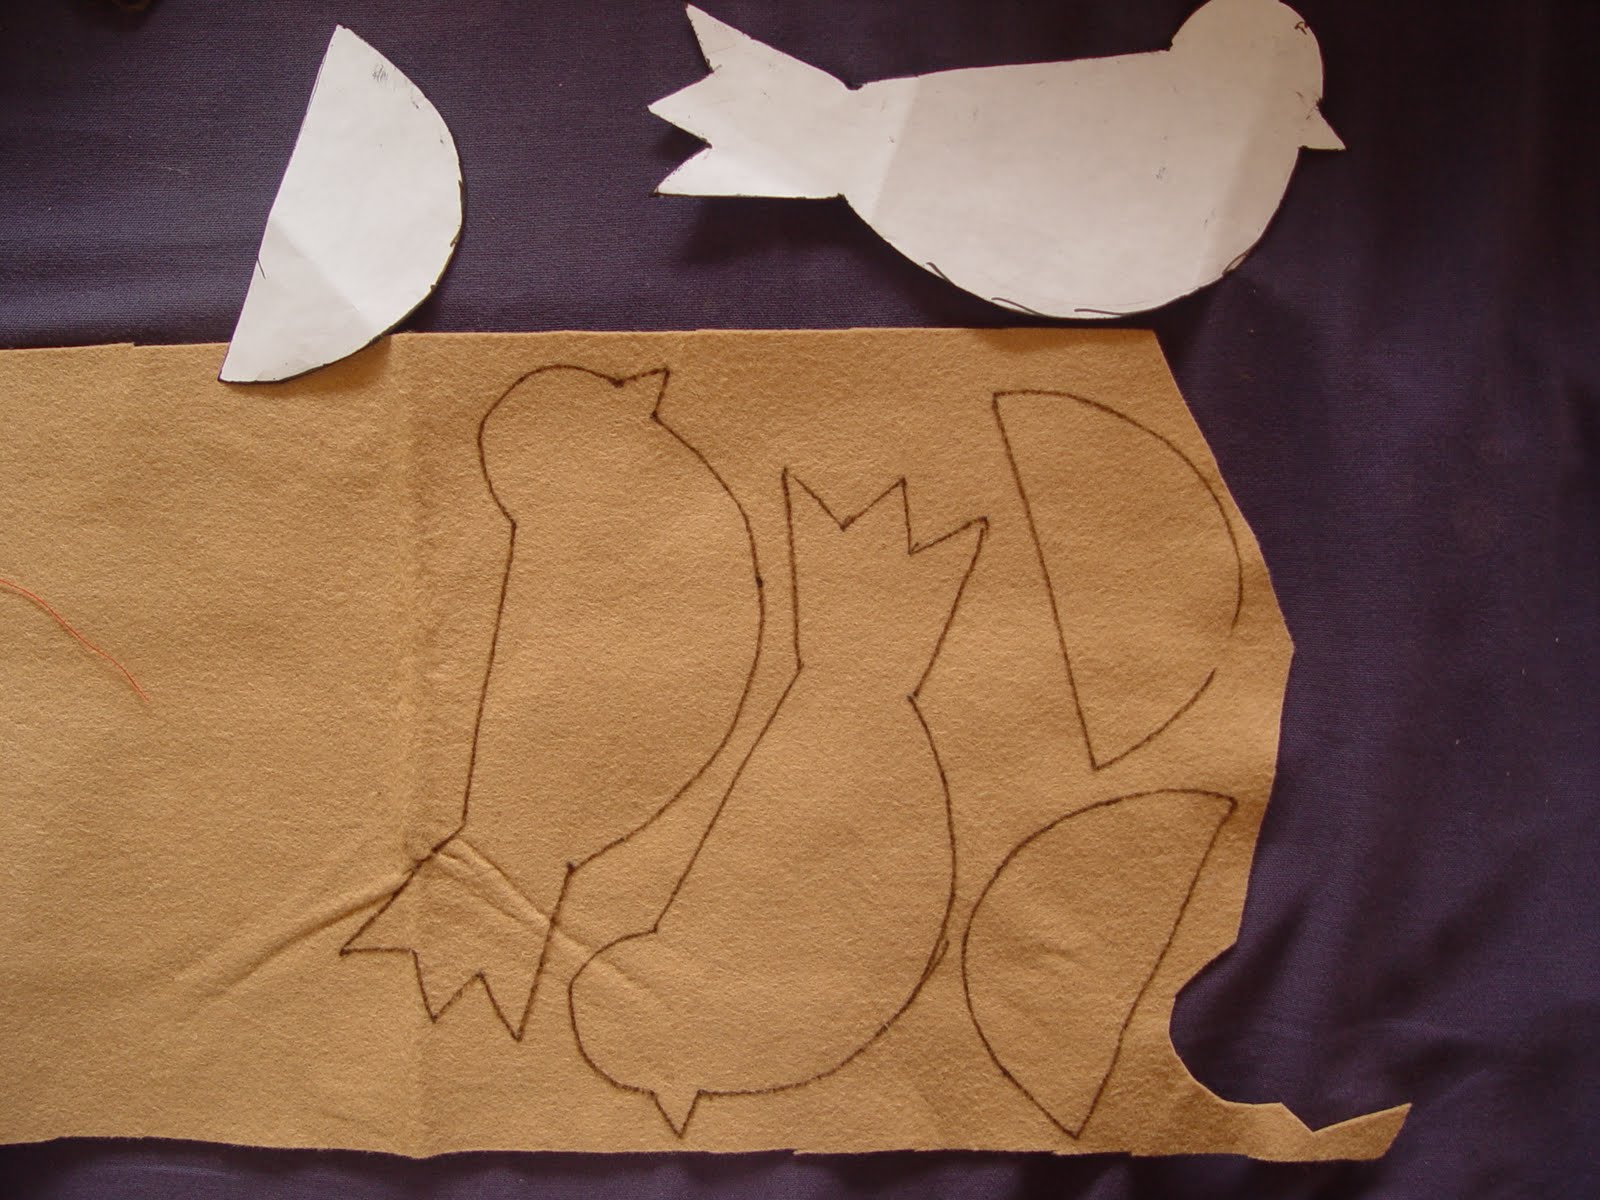
I wanted the wing color to be different than the body color, and since there were 5 colors and I decided to make 5 birds, each color was used for the body once and the wings once.

After cutting out the bodies and wings, I sewed the wing onto one side of the body. I sewed the other wing onto the other half of the body. I didn't do this first the first time I made one of the birds and then I had to hand stitch it (I like the clean stitches from the sewing machine, since the stitching shows on the birds).

Next I sewed the two halves of the body together. I sewed most of the way, leaving enough space at the tummy to stuff the birds. I decided I wanted to hang all of our birds in a row from one piece of yarn, so I also sewed the yarn into the body.

In order to give the birds some shape and strength, I stuffed them each with cardboard I cut off of a pizza box. Then I stuffed them with the bits of felt that were leftover from cutting out all the pieces, to give each one a more rounded shape. Then I used the sewing machine to stitch up the belly of each bird.

Here's the final product hanging on the back of our door...awwwwwww.

Thursday, October 14, 2010

homemade laundry detergent makes me soooo happy

i've been making my own soap for 2 years now and really enjoy making my own body products. so 6 months ago i thought i should look into making laundry detergent too. oh goodness is it awesome. i think it's one of the best cheap-person-saving-money-tricks i've found out there. it might actually be THE best in my book because it is so ridiculously easy to do. i made a 5 gallon batch of it around 6 months ago....and it just ran out this week. part of this has to do with the fact that jay and i do laundry maximum 3 times a month. but since it was time to make more, i thought i should blog about the magic of homemade laundry detergent.

Ingredients
to make laundry detergent you only need 8 items:
-one bar of soap (any kind)
-1 cup washing soda
-1/2 cup borax
-around 3 gallons of water
-a 5 gallon bucket
-a cheese grater
-a medium sized pot
-a long thing for stirring (i used a stick)

washing soda was the hardest ingredient to track down. nevertheless, i tracked it down in grants pass so it should be find-able anywhere. i found a big box of arm & hammer washing soda at fred meyer in the laundry aisle near the borax. best to call shops ahead of time to save yourself the misery, since many places don't seem to carry it.

borax is optional, as some people think it's harsh on colors, but i use it because with all jay's nasty woodworking-welding-painting-roofing-handymaning clothes we need all the cleaning power we can get.

the first batch i made with a bar of dr. bronner's unscented soap. this second batch i made using fels naptha laundry soap, since i had most of a bar still sitting around (i used a bit of it to dry my skin out when i got NASTY poison oak this summer...should prob blog about that later). if you have those mini bars of soap you get from hotels, i read about a lady using them in this recipe, and i thought that was a great use for useless soap.

we have a lot of 5 gallon buckets lying around, but if you don't then you can usually get one from a hardware store for 3-4 bucks. or you could get a free one from a restaurant, they throw them away all the time. if you have another 4+ gallon sized container handy, feel free to use that.


Directions
1. in a medium sized pan, bring 4 cups of water to a boil
2. while the water is boiling, grate the whole bar of soap
3. once a boil is reached, turn the water down to a simmer. add the grated soap bit by bit into the water, constantly stirring the pot so that the soap dissolves. you'll end up with really soapy soupy water.
4. put the washing soda, borax and 3 gallons of warm water into the bucket and stir
5. next add the dissolved soapy water into the bucket and stir. it'll just look like mildly soapy water at this point, but wait for the magic to happen
6. put the lid or cover on the bucket and let it stand for 24 hours.
7. the next day, marvel at your creation and use 1-2 cups per load (im more lax about using more of this detergent since its so cheap).

this is what mine looked like in the morning the day after i made it:

just looks like yellowish (from the fels naptha soap) soapy water right? but here's what it looked like when i started stirring it:


WHOA! its gelatinous! this is by far my favorite bit about laundry detergent making....for some reason with these ingredients, once you let it sit it thickens into a gel! so cool. i read that this varies depending on what kind of soap you use, and probably on if you use borax or not.

so my cost break-downs were something like:

$4 for washing soda
$3 for borax
$3 for bar of soap

but the washing soda and borax are big enough that you have enough of these ingredients for 5 or 6 batches of homemade detergent. so for us, that's 3 years worth of detergent! oh, and i checked out the ingredients for some 'natural' laundry detergent from the store, and it had washing soda as the chief washing agent too...soooo might as well make it ourselves and save hella money.

one more thing- jay is really sensitive to scents in laundry detergent, otherwise i'd probably use some essential oils to make our clothes smell yummy. lavender and tea tree oil are both cleansing and smell damnnnn good (would be a nasty combination though).

for a real price breakdown and a test between tide and homemade detergent check this out. this is also the full recipe i use. this guy found that homemade detergent works just as well as tide, but costs only $6.97 for 312 loads of laundry, whereas tide costs $62.60 for the same amount of loads.

bottom line: making your own laundry detergent = fun+money saving+clean clothes+weird gelatinous goo+awesome. so now i have another 6 month supply of laundry detergent. you should make some too!

Thursday, October 7, 2010

Crazy Canning

Ok, so this past year i read Animal Vegetable Miracle by Barbara Kingsolver. it's all about her family's experience eating local, in-season foods from their garden and regional farmers. i loved and was inspired by it. call me crazy, but it seems to me like we should be willing to spend more time and money on the foods that literally sustain us than the majority of our society does. i know this is a cultural value, and we're in an economic recession, but it's also about personal priorities. i myself am one of the cheapest people of all time. 'free stuff' is my mantra and i can successfully live on a few hundred bucks for many months. BUT still, i hope that one day we'll be able to consider the taste, growing methods and location, and health-giving value of the foods we eat, in addition to how much they cost. i don't mean to place blame on people for eating cheap or imported foods, i just want to call attention to flaws in the whole food system.

pardon my rant.

so one of the things that barbara kingsolver (my hero) wrote in her book was, and i paraphrase, "it's totally acceptable to walk up to a grower at the farmer's market, say 'yo gimme all your ____ [insert name of desired fruit or veggie here]', take it home and can the crap out it". heck yes. and for some reason, while i was hoeing at a local farm and listening to the audio version of this book this spring, this notion really, as the hippies say, 'resonated' with me.

trouble was, we moved to a new bus spot in the middle of summer, didn't have a garden going, were relatively broke, i'd never canned before, and being a mild (read: extreme) hypochondriac, the idea of toxins such as botulism killing me simply because i canned salsa without enough acid was super freaky-deaky...and not in a fun way. i sucked it up though, and decided it's really important to me to have local foods in winter. and seeing as essentially all my favorite foods grow in summer and fall, i thought i'd better find a way to make barbara proud and store some foods for the months to come.

basic food storage options are, of course: freeze, dehydrate, can. we don't have a freezer. and we don't have a dehydrator. i did look into solar dehydrators, and made a simple one for drying blueberries in the middle of summer. but it took a damn long time for the berries to dry and birds ate half of them. i'll make a better dehydrator next year.

but in the meantime i got pretty excited about canning. i picked blackberries, bought some items at farmstands in rogue river and murphy and bought hella tomatoes from the grants pass grower's market. so far, i've canned 6 pints of wild blackberry jam, 9 pints of plum jam, 17 quarts of tomatoes, and 16 pints of salsa. we're also fermenting dill pickles for canning. more than anything, i'm excited about the jam because i was able to use local honey as the sweetener. mmmmmmm.

admittedly, this isn't a ton of canned-ness, and it probably won't last us very long. but i feel proud nevertheless for having tried something new that sticks with my (sometimes ridiculous) values. if you're interested, these are the recipes i used for jam, canned tomatoes, and salsa.

it's really fun to can, even in a tiny bus sized kitchen. and doesn't take as much time, energy, OR money as i was expecting. for the produce i spent:
-$60 for around 70 pounds of tomatoes
-$6 for peppers
-$3 for onions
-$10 for honey
-$10 for cucumbers
-$9 for plums
-$8 for lemon juice
-$4 for pectin
for a grand total of $110 dollars.

which is a lot, but it's also for 48 cans of food. and if we assume that 32 ounces of organic canned tomatoes from the grocery store is around 3 dollars, a pint of salsa is 4 dollars, a pint (way bigger than the normal jam jar size) of jam is 6 (and will most likely have corn syrup as the sweetener!), that adds up to a cost of 205 bucks. so really i saved 95 dollars! PLUS i know where and how the foods were grown, what's in them, and how they were preserved.

Yay canned foods!