Monday, March 7, 2011

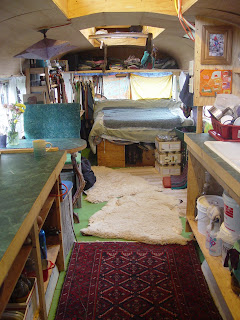
This morning was a good morning for living in a bus. What I mean is, every so often during the bleak winter months the sun sneaks out past our blanket of overcast skies and pays us terrestrial beings a brief visit. This morning was one such fortuitous encounter, and is notable because lately I’ve been feeling ambivalent about living in a bus. Its major highlight is of course the economy of it and among the shortcomings: ubiquitous mold, relentless fire-tending responsibilities, and insufficient personal space. Nevertheless, I always feel a special twinge of homeyness when those bright rays pour in through our windows at that perfect angle only sunrise can provide. I tried to photograph it for posterity--to capture the essence of a blissful morning breakfast in a school bus-—but alas, it was beyond my photographic capabilities. My pictures merely illustrated the essence of a half-tidy bedroom with socks drying on the line. Anyhow, those short few minutes of sunshine and warmth helped me to appreciate our current living accommodations, and generally just brightened my day. Feeling inspired, I've taken to the keys to write a little about what we’ve been up to in this new year.


To celebrate my quarter-centennial birthday (back in January), we rented this cabin up in the mountains of the Cascades, in a tiny town called Detroit. As you can see, it’s a super-cute little A-frame that felt to us like a mansion (the phenomenon of relativity…). Our intentions were to cross-country ski (for her) and soak in hot water (for me), we tried to choose a place that was close to hot springs and a ski area. It turns out that the weather that weekend (warm and rainy) melted all the snow; so, we just relaxed in our mansion, walked around Dexter, explored the banks of a flooding river, and went to Breitenbush Hotsprings. Since the hotsprings is also a vegetarian community, we had to sneak back to the car and eat yummy chicken parmesan.

In case you were feeling bad for Katarina... we did go skiing eventually. A few weeks ago, we had another west-coast blizzard (defined as a few inches of snow in the valley that melts by mid-day). It was pretty pathetic down where we live, but up at Mt. Ashland the snow was good. We rented skis, drove up to the snow park and Katarina schooled me in cross country skiing. It seemed more like walking awkwardly on a slippery surface than fun at first, but I got more into it as we went along. She really liked it, so we’re going to have to go again. Actually, I kind of envision a compromise between skiing and boating wherein I get interested in skiing during the winter and in exchange, Katarina nurtures her little kernel of an interest in sailing for summertime. We'll see.


This is our new mailbox. I decided to make it after a funny encounter with our landlady one night. Here’s what happened. Our bathroom is right next to the front door. Our landlady likes to walk the dogs down the driveway and bring the mail back up. Sometimes she stops at the bus and delivers our mail. Sometimes I poop at night. One night I was sitting down to poop when I heard her come up the stairs and knock on the door. I told her that I’d let her in but I was on the potty. She left the mail on the porch.

After that, I thought it might be nice to make it easier for her to deliver the mail. The mailbox is made entirely with scrap materials and stuff out of the wood pile. Pull down on the lever and the door is counterweighted (beer bottle) to open on its own. Landlady says it’s the cutest thing she’s ever seen.


I don’t know if it has anything to do with the bus, but recently I’ve been noticing certain quirky things about where we live. For example, one morning a while back we heard this funny sound outside and discovered a red pileated woodpecker banging away at the plastic backboard of the basketball hoop. It’s a great sound: perfectly smooth and precise, like a drum-roll. For the past few weeks, this woodpecker has returned every morning between the hours of 7am and 8am for a few minutes of practice. He (or she?) never misses a day. I think its endearing. We have our own personal alarm-clock bird (except we’re always up by 6:30 anyways).


The last thing I have to report about is our wood-fired bathtub. One of the first things I did with the bus after building the porch was to install a cast-iron tub back there. It was quite a job actually. I acid-etched the old scummy inside and refinished it with a special epoxy. Then I build an enclosure out of cedar and I thought it looked pretty nice. But, it never actually got plumbed in and instead of being a bathing apparatus, it became a bottomless pit for "storing" random stuff. It started bothering both of us recently, so one Sunday we took it out and rolled it down off the porch. I’ve always wanted a wood-fired tub, and we needed to do something with the thing, so I started digging a trench.


After a few days of messing around, it was done (kind of).


The fire burns at one end in an enclosed firebox and runs under the tub to the other end, where the smoke goes up the chimney. Once the fire is going strong, the smoke is pretty minimal. Of course, everything in this project was salvaged or left over from other projects--the cost was zero. Two cedar butt-boards save one’s bum from roasting and the temperature goes from hose-water cold to between 105-110F in about an hour. We like it.

That is a fair chunk of the interesting, fun-sounding stuff we've been up to. Katarina has been very busy working and getting the Master Recycler Class off the ground (which I am taking). I've been playing the game of attempting to balance work, assignments, classes and extra-curricular activities. It's a game that I never imagined I would get good at, and the intensity always peaks right around now (in the last two weeks of the term). Wish me luck. We just had our sustainability club open mic and "trashion show" today and it surpassed all of my expectations. Katarina and I were both models (along with several other students) and I will have to link to pictures once they're available. Just to whet your appetite, picture me on stilts, wearing a ridiculous zebra outfit and performing the composting poop song. See, aren't you sad you missed it?

Saturday, January 1, 2011

fun lil (christmas) craft: making paper lanterns

every year at christmas my family makes ginger bread houses out of graham crackers. this year we didn't. instead- we all got a little addicted to a simple little craft that my friend megan introduced to me.... making paper lanterns. its nice because its a good reuse for all that tissue paper that is used to wrap presents this time of year.

its ingredients can pretty much be found around the house. all you need is:
-tissue paper of various colors
-white glue
-balloons (we used water balloons, but you can use any size..it just depends on what size lanterns you want)
-a bowl and spoon
-scissors
-water
steps
  1. cut tissue paper into 2x4 inch strips. we decided it's easier to cut the paper up ahead of time, rather than while you're covered in glue and making the lantern.
  2. put an ounce or two of glue into the bowl, add twice as much water as there is glue. mix glue/water mixture together with spoon.
  3. set up work space. you're gonna get glue on your hands, the table and maybe the floor, so you might want to put down a plastic table cloth. we didn't do this, but we definitely had to clean up some table goo as a result.
  4. blow up balloon to desired lantern size.
  5. start working! dip the tissue paper pieces one or two at a time into the gluewater. it helps to squeegee the excess glue off the paper with one hand while you hold it with the other. or let it drip for a few seconds.
  6. put paper on the balloon in a circle so that there is no paper within several inches on the balloon's nipple. otherwise you will have a funny egg shaped lantern. you can also push the paper down to the desired size/to make is even after you're done, but this makes for a thick edge.
  7. cover balloon with 4-6 layers of paper. we used white as the first few layers of paper and then used fun colors on top of that.
  8. once you're satisfied with the beauty of your balloon, hang it up to dry for 24 hours. we hung up a piece of string over a window and hung around 15 balloons off it.
  9. pop the balloon once it is dry!
  10. do with your lanterns as you wish. you can put tealights in them. or you can poke holes in the bottom of the lantern and stick christmas lights through each one (what we did- as you can kind of see if the first photo above). tis quite nice. and soothing to make.

Tuesday, December 14, 2010

It's the most wonderful time of the year!

The holiday season is upon us. We both wanted more lights this year... so we did this to the porch:


and here is our little house under a ginormous oak tree (as seen from the driveway):


Lots of cool stuff has happened since the last blog post. For example, I finished welding up the woodstove and installed it. Have a look:


Looks like an ugly robot right? This is kind of what it began as:


Except, it did have a top on it. I cut it off because the metal was warped, rusting through and the collar that connects with the flue pipe was the wrong size. The new and improved stove features new swivel air intakes, glass windows in the door (so we can actually see the fire!), an air wash system that keeps the window glass clean, secondary air tubes inside the stove (that make the stove re-burn escaping smoke for better efficiency / less pollution), and the inside is lined with firebrick. I added gaskets around the door to make an air-tight seal, two handles & latches to close and lock the door, a little tray that catches embers that sometimes fall out when the door is opened for loading (and it keeps the door from opening too much), and heat-shields on the back and bottom for extra safety + convection circulation. I did a bunch of other stuff too, but its not really important. What matters is, now we have a source of heat that makes plenty of warmth for the bus, a nice fire glow at night and .... lots of crackling sounds!

We've also been taking a lot of walks together; we're trying to walk together once a day. On these walks, we started hunting for mushrooms and identifying the easier ones to learn. Chanterelles are pretty simple to ID and not really dangerous if you mess up - so we started there. Here is Katarina with some of our catch:


We cut them up:


And with this recipe (http://www.earthy.com/Cream_of_Chanterelle_Mushroom_Soup_W185.cfm) we made delicious Cream of Chanterelle Soup:


It actually tasted much better than it looks in that picture. Since then, we've found a lot of interesting mushrooms and some of them quite edible. In fact, in the little strip of forest directly adjacent to my parking spot at the college, I found a huge cache of Matsutake mushrooms (http://botit.botany.wisc.edu/toms_fungi/sep2000.html). They smell weird and don't taste like much....but are worth a lot of money in Japan!

This is our fake-dog Dave:


He's a real dog, he's just not our dog. We wish that he was. Anyways, my last piece of exciting news is that we officially joined a CSA for the winter season. Winter Season? What's this? Yes... amazingly there are enough things growing in Oregon during winter that there are actually winter CSA's. Here is a taste of our first pickup:


Those green fractals are actually a type of broccoli. It's really edible too. They also gave us this great squash that can double as a phone in a pinch:


Anyways. Happy holidays to everyone. I'm off to make presents and celebrate being done with Fall term at the YMCA (they're close and have a hot tub...)

Monday, November 1, 2010

Bus Pictures!!!

It’s blog time again, it’s my turn and I’ve been informed that this post is overdue. I’d like to share something personal: at the top of the list of things I’ve mentally kicked myself for procrastinating this year is waiting until October to install windows and weather-strip big openings to the great outdoors.

The time I have these days for doing non-essential activities (such as sleeping or having fun) has waned to approximately zero, as my brain quietly implodes under the immense pressures of school and work. In the little cracks of time that dot my schedule, I’ve been making slow progress on the bus. I was surprised this evening, as I sorted through a pile of old bus to-do lists, with the way big progress has been made in small, mostly unnoticed steps. A sampling of the once to-be-done and now completed tasks includes: prep + paint outside loft walls, paint + install outside window trim, install metal roof + flashing, build frames + install glass windows (loft), remove rocket stove, new concrete bottom step, fix broken bus window, paint floor, plumbing for water heater, new electrical wiring/breaker for water heater circuit, and run permanent electrical wiring for lights and outlets inside the bus. Sorry if that was a long and boring list—for some reason, I really enjoy re-reading lists of stuff I did and therefore don’t have to worry about anymore.

Sitting on bed, looking back through the living + dinning rooms, kitchen, bathroom and shop at the "front" door.


Of the recent projects, those that have had the greatest impact on quality of life in the bus (at least for me) are hot water, removal of the rocket stove, and finally sealing things up with windows. Up until last weekend, the 16 window openings that I built into the loft (raised roof portion of bus) were screened in to exclude bugs but lacked any way to close out the elements. This was fine all summer in So. Oregon because it never gets cold, but was truly starting to suck as cold and wet weather moved in. After busting ass all weekend (and sacrificing some time I probably should have spent on homework), the windows were finished and the bus has acquired the amazing ability to retain warmth. As a bonus, it is also much quieter inside when it’s raining or windy.

Kitchen sink, pantry shelves, refrigerator...

Windows!

Loft finally gets a real roof...


The original rocket stove in the bus (the second thing, after a basic wood floor, that I built inside) was a behemoth contraption of steel and cob (read: dried mud). Grotesquely funky and homegrown, I always thought it was super cool and it generally worked as it was meant to: generate heat and warm up water. The problems were, it wasn’t totally finished, was potentially un-roadworthy and took up way too much valued floor space in an already cramped little mini-home. Solution? Tear it out and start over. Yep, I ripped that thing out faster than it took me to dream it up, and as fortunate has it we were offered a free woodstove soon thereafter. I hauled our new stove home and decided to do some repairs (it’s an older stove) and upgrades that would improve the efficiency (burn less wood and make more heat and put less particulates up and out the flue). I’m currently finishing up the metalwork on that in the welding shop at the community college.

Looking forward into the front of bus.

Other side of kitchen w/ counter, shelving, dishes, mini-gas range in the background

Future location of woodstove (currently occupied by propane tank)


Last but not least, I have to put in a good word for hot water. I must admit that for a short time, I foolishly believed I could get by without it; but, now that it is hooked up and feeding the sink with nearly instant, steaming hot H20 on command, I’ve never been happier or more appreciative of such a simple pleasure. I found our little 10 gal tank heater on craigslist, scored it for cheap and plumbed it in right above the sink so it only takes a few seconds to get the good stuff at the tap.

Inside of the bathroom (view from the toilet)

Amazingly simple composting toilet setup!

Bedroom, closet, study area, computer desk region...


We haven’t posted any interior pictures of the bus for a long time, so I took some and put them randomly into the post. Some of them turned out kind of foggy - not sure why. By the way, here goes a big thank-you to Laurie for the deluxe Turkish rug that adorns the kitchen floor. She even mailed it to us after we forgot to take it home on the plane. It fits perfectly where Katarina had envisioned it. Also, I love my compost shirt and wear it all the time.

Before the floor was painted (and rocket stove is kind of visible on the right near the bed)

Unfortunately small shop space

Bathroom "door" next to front door and key-hanging, calendar-looking area.


Thanks for reading!

Friday, October 22, 2010

Sick time = craft time

I’ve been feeling pretty rank the last few days, but I’ve tried to suck it up and go to work (hopefully I didn’t give germs to TOO many kids). Today I woke up and knew there was noooo possible way I could go to work. I could hardly talk and had to cough after every 2-3 breaths. So I called in sick. Jay went to work and I told him I would ‘rest’. He walked out the door and I pulled out my sewing machine. Crafting is just as meditative as actually sleeping, so I figure I might as well craft instead of trying to sleep (let’s face it sick-sleep is not very restful, I get woken up about every 3 minutes by my gross cough). I wanted to make us some cute little birdies to hang on the door. Let me explain.

Last weekend, we went to a baby shower for a frien
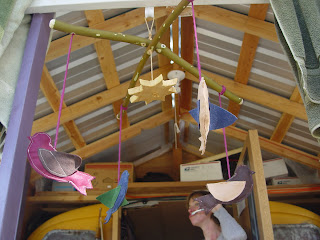
d of ours. We made them a homemade baby mobile, out of 'natural materials'. We bought some wool felt from the fabric store, in 5 non-bright colors:I sewed 4 little birdies, with bodies that were different colors from their wings. We chopped down a madrone branch in the forest and used that as the top-bit of the mobile, 2 branches nailed together so they could still swivel. Jay used his tools to cut and then sand a small sun, which he oiled with olive oil. The sun hung from the center of the branches, down between the birds. The birds were hung from yarn at each end of the 2 branches. Here is a not-so-good picture of the result (check it out, I'm brushing my teeth in the background):

I thought it was really cute. Jay did too. I think the family we gave it to did too. It was a really fun present to make, didn’t take that long, and I hope the baby will love looking at it.

So on this here sick day, I was feeling inspired to make a few birdies for decoration in the bus. I made a paper pattern for the bird and it's wing. I got the idea for felt birds from this awesome site, but chose to simplify the tail so it'd be easier to sew. I also think this bird mobile is super cute, but it doesn't work well with felt. Each bird is about 7 inches from nose to tail tip. I copied and cut out 2 bodies and 2 wings from each felt color:

I wanted the wing color to be different than the body color, and since there were 5 colors and I decided to make 5 birds, each color was used for the body once and the wings once.

After cutting out the bodies and wings, I sewed the wing onto one side of the body. I sewed the other wing onto the other half of the body. I didn't do this first the first time I made one of the birds and then I had to hand stitch it (I like the clean stitches from the sewing machine, since the stitching shows on the birds).

Next I sewed the two halves of the body together. I sewed most of the way, leaving enough space at the tummy to stuff the birds. I decided I wanted to hang all of our birds in a row from one piece of yarn, so I also sewed the yarn into the body.

In order to give the birds some shape and strength, I stuffed them each with cardboard I cut off of a pizza box. Then I stuffed them with the bits of felt that were leftover from cutting out all the pieces, to give each one a more rounded shape. Then I used the sewing machine to stitch up the belly of each bird.

Here's the final product hanging on the back of our door...awwwwwww.

Thursday, October 14, 2010

homemade laundry detergent makes me soooo happy

i've been making my own soap for 2 years now and really enjoy making my own body products. so 6 months ago i thought i should look into making laundry detergent too. oh goodness is it awesome. i think it's one of the best cheap-person-saving-money-tricks i've found out there. it might actually be THE best in my book because it is so ridiculously easy to do. i made a 5 gallon batch of it around 6 months ago....and it just ran out this week. part of this has to do with the fact that jay and i do laundry maximum 3 times a month. but since it was time to make more, i thought i should blog about the magic of homemade laundry detergent.

Ingredients
to make laundry detergent you only need 8 items:
-one bar of soap (any kind)
-1 cup washing soda
-1/2 cup borax
-around 3 gallons of water
-a 5 gallon bucket
-a cheese grater
-a medium sized pot
-a long thing for stirring (i used a stick)

washing soda was the hardest ingredient to track down. nevertheless, i tracked it down in grants pass so it should be find-able anywhere. i found a big box of arm & hammer washing soda at fred meyer in the laundry aisle near the borax. best to call shops ahead of time to save yourself the misery, since many places don't seem to carry it.

borax is optional, as some people think it's harsh on colors, but i use it because with all jay's nasty woodworking-welding-painting-roofing-handymaning clothes we need all the cleaning power we can get.

the first batch i made with a bar of dr. bronner's unscented soap. this second batch i made using fels naptha laundry soap, since i had most of a bar still sitting around (i used a bit of it to dry my skin out when i got NASTY poison oak this summer...should prob blog about that later). if you have those mini bars of soap you get from hotels, i read about a lady using them in this recipe, and i thought that was a great use for useless soap.

we have a lot of 5 gallon buckets lying around, but if you don't then you can usually get one from a hardware store for 3-4 bucks. or you could get a free one from a restaurant, they throw them away all the time. if you have another 4+ gallon sized container handy, feel free to use that.


Directions
1. in a medium sized pan, bring 4 cups of water to a boil
2. while the water is boiling, grate the whole bar of soap
3. once a boil is reached, turn the water down to a simmer. add the grated soap bit by bit into the water, constantly stirring the pot so that the soap dissolves. you'll end up with really soapy soupy water.
4. put the washing soda, borax and 3 gallons of warm water into the bucket and stir
5. next add the dissolved soapy water into the bucket and stir. it'll just look like mildly soapy water at this point, but wait for the magic to happen
6. put the lid or cover on the bucket and let it stand for 24 hours.
7. the next day, marvel at your creation and use 1-2 cups per load (im more lax about using more of this detergent since its so cheap).

this is what mine looked like in the morning the day after i made it:

just looks like yellowish (from the fels naptha soap) soapy water right? but here's what it looked like when i started stirring it:


WHOA! its gelatinous! this is by far my favorite bit about laundry detergent making....for some reason with these ingredients, once you let it sit it thickens into a gel! so cool. i read that this varies depending on what kind of soap you use, and probably on if you use borax or not.

so my cost break-downs were something like:

$4 for washing soda
$3 for borax
$3 for bar of soap

but the washing soda and borax are big enough that you have enough of these ingredients for 5 or 6 batches of homemade detergent. so for us, that's 3 years worth of detergent! oh, and i checked out the ingredients for some 'natural' laundry detergent from the store, and it had washing soda as the chief washing agent too...soooo might as well make it ourselves and save hella money.

one more thing- jay is really sensitive to scents in laundry detergent, otherwise i'd probably use some essential oils to make our clothes smell yummy. lavender and tea tree oil are both cleansing and smell damnnnn good (would be a nasty combination though).

for a real price breakdown and a test between tide and homemade detergent check this out. this is also the full recipe i use. this guy found that homemade detergent works just as well as tide, but costs only $6.97 for 312 loads of laundry, whereas tide costs $62.60 for the same amount of loads.

bottom line: making your own laundry detergent = fun+money saving+clean clothes+weird gelatinous goo+awesome. so now i have another 6 month supply of laundry detergent. you should make some too!

Thursday, October 7, 2010

Crazy Canning

Ok, so this past year i read Animal Vegetable Miracle by Barbara Kingsolver. it's all about her family's experience eating local, in-season foods from their garden and regional farmers. i loved and was inspired by it. call me crazy, but it seems to me like we should be willing to spend more time and money on the foods that literally sustain us than the majority of our society does. i know this is a cultural value, and we're in an economic recession, but it's also about personal priorities. i myself am one of the cheapest people of all time. 'free stuff' is my mantra and i can successfully live on a few hundred bucks for many months. BUT still, i hope that one day we'll be able to consider the taste, growing methods and location, and health-giving value of the foods we eat, in addition to how much they cost. i don't mean to place blame on people for eating cheap or imported foods, i just want to call attention to flaws in the whole food system.

pardon my rant.

so one of the things that barbara kingsolver (my hero) wrote in her book was, and i paraphrase, "it's totally acceptable to walk up to a grower at the farmer's market, say 'yo gimme all your ____ [insert name of desired fruit or veggie here]', take it home and can the crap out it". heck yes. and for some reason, while i was hoeing at a local farm and listening to the audio version of this book this spring, this notion really, as the hippies say, 'resonated' with me.

trouble was, we moved to a new bus spot in the middle of summer, didn't have a garden going, were relatively broke, i'd never canned before, and being a mild (read: extreme) hypochondriac, the idea of toxins such as botulism killing me simply because i canned salsa without enough acid was super freaky-deaky...and not in a fun way. i sucked it up though, and decided it's really important to me to have local foods in winter. and seeing as essentially all my favorite foods grow in summer and fall, i thought i'd better find a way to make barbara proud and store some foods for the months to come.

basic food storage options are, of course: freeze, dehydrate, can. we don't have a freezer. and we don't have a dehydrator. i did look into solar dehydrators, and made a simple one for drying blueberries in the middle of summer. but it took a damn long time for the berries to dry and birds ate half of them. i'll make a better dehydrator next year.

but in the meantime i got pretty excited about canning. i picked blackberries, bought some items at farmstands in rogue river and murphy and bought hella tomatoes from the grants pass grower's market. so far, i've canned 6 pints of wild blackberry jam, 9 pints of plum jam, 17 quarts of tomatoes, and 16 pints of salsa. we're also fermenting dill pickles for canning. more than anything, i'm excited about the jam because i was able to use local honey as the sweetener. mmmmmmm.

admittedly, this isn't a ton of canned-ness, and it probably won't last us very long. but i feel proud nevertheless for having tried something new that sticks with my (sometimes ridiculous) values. if you're interested, these are the recipes i used for jam, canned tomatoes, and salsa.

it's really fun to can, even in a tiny bus sized kitchen. and doesn't take as much time, energy, OR money as i was expecting. for the produce i spent:
-$60 for around 70 pounds of tomatoes
-$6 for peppers
-$3 for onions
-$10 for honey
-$10 for cucumbers
-$9 for plums
-$8 for lemon juice
-$4 for pectin
for a grand total of $110 dollars.

which is a lot, but it's also for 48 cans of food. and if we assume that 32 ounces of organic canned tomatoes from the grocery store is around 3 dollars, a pint of salsa is 4 dollars, a pint (way bigger than the normal jam jar size) of jam is 6 (and will most likely have corn syrup as the sweetener!), that adds up to a cost of 205 bucks. so really i saved 95 dollars! PLUS i know where and how the foods were grown, what's in them, and how they were preserved.

Yay canned foods!